
 Let’s talk about spatchcocking, the word that seems like it should be an entry on urban dictionary but is actually the removing of the backbone on your bird so it can lay out flat and cook evenly. I’ve been doing for years now for my thanksgiving turkey and every chicken that’s not a rotisserie from Costco 🙃
I know you’re probably thinking why? Why do I need to go out of my way to Terry Dubrow a turkey before it goes into the oven? It seems a little daunting the first couple times because you’re literally cutting through bones like this is a saw movie but once you get it, you get it. Obviously there’s some good to this method, I’m a lazy bitch where minimum effort always tries to meet maximum results:
First up, the time. We’re talking an hour for a 14 pound bird, none of this 3 1/2 hours mess when you’ve got pies and stuffing to get going.
When you roast the bird for less time it means less of a chance for it to dry out. It’s roasted for less time because spatchcocking it flattens it out, letting all the meat cook evenly. When you just throw a whole bird in the white meat ends up cooking first, then continues to cook while we sit around and wait for the dark meat to finish cooking, resulting in white meat that has a close relationship to chalk. This also means no brining nonsense.
The final yahoo about the process is that you need somewhere for that backbone to go when it’s removed and the answer is bonus turkey stock. Usually you have to buy extra wings or legs beforehand to make a stock so you can have the gravy with the meal but now with all this happening you can make a quick simple stock, while the turkey roasts, and have really great rick gravy for thanksgiving dinner.
 Now that we’ve gone over the why we can go over the how. First up is the cast of characters:
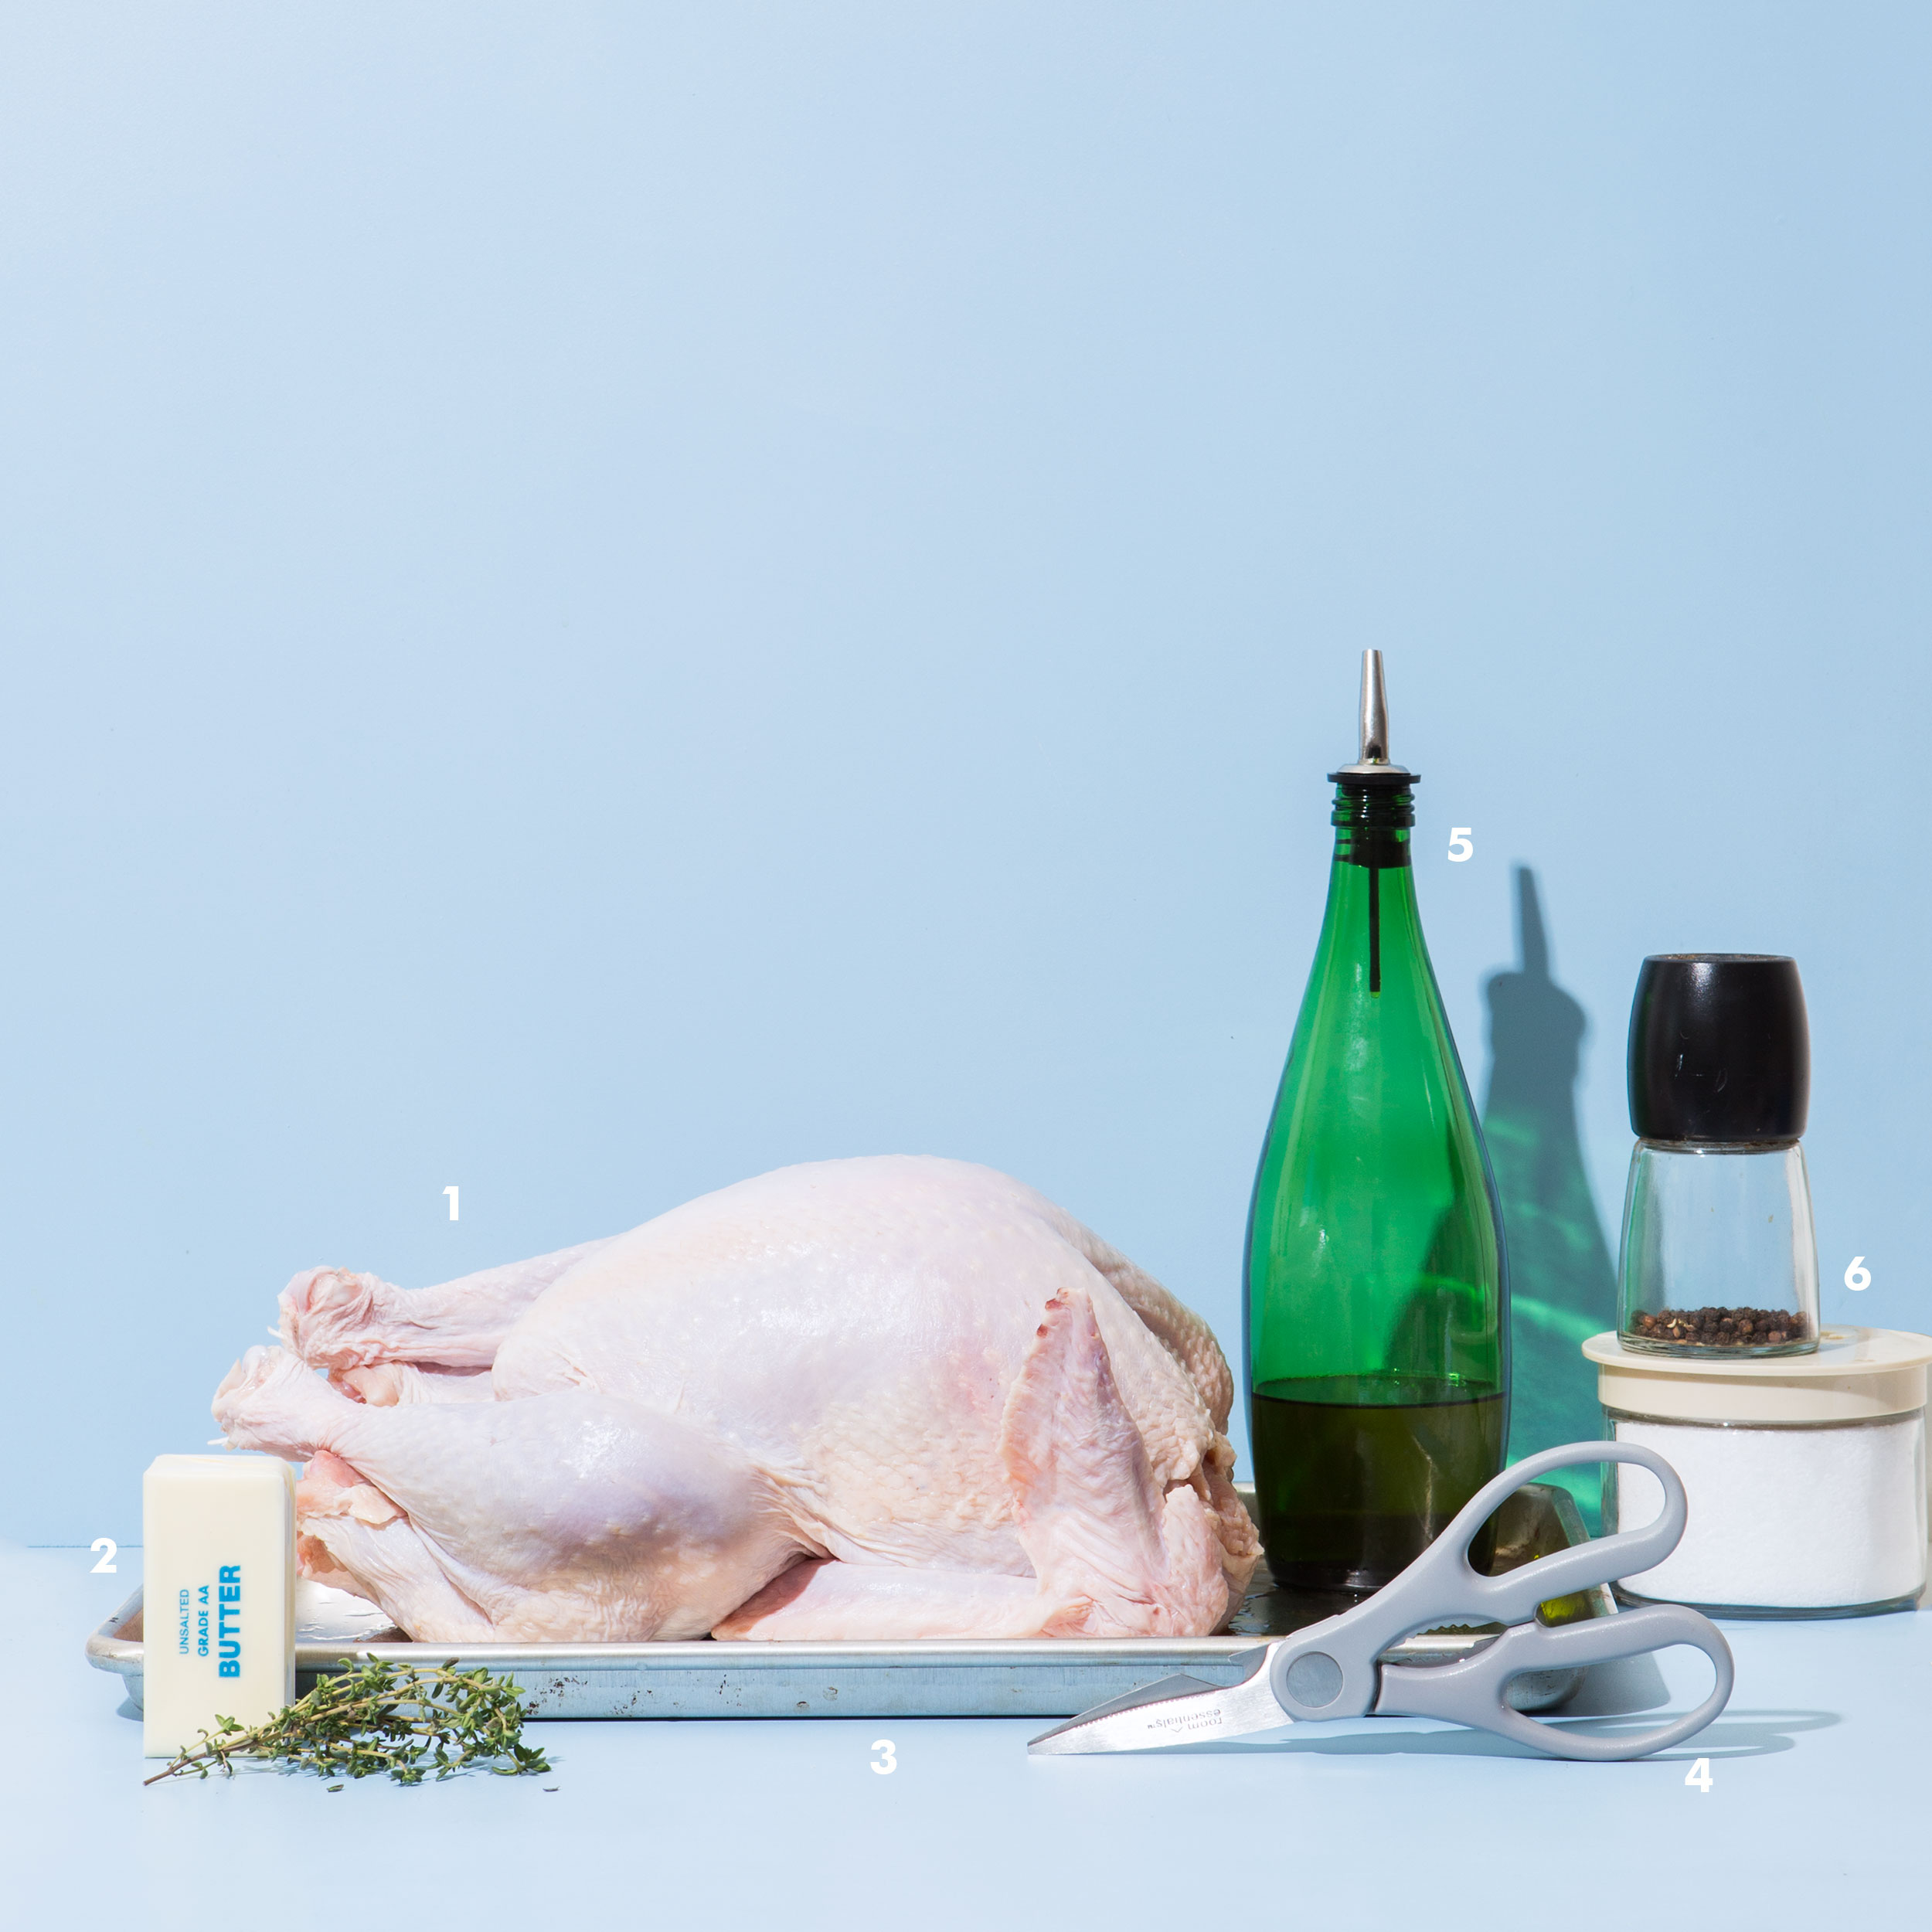
- The turkey itself. This one’s 14 lbs, that’s usually the one I go for in the store because I think it’s perfect for spatchcocking, but you can go up to 20 lbs if you’re my mom and you need that much turkey for dinner, you’ll just adjust the time and need a larger baking sheet.
- The flavor. Butter (or another fat) and aromatics help a lot with adding flavor to the breast meat under the skin because it really does need the help, or else you’ll just end up with a nice moist turkey breast that tastes like something that resembles a sponge. I used butter, garlic, and salt for this guy but I tried Adrianna’s mojo turkey and it miiiight just be my favorite flavor combo for turkey day.
- Baking sheets. I’ve got every size under the sun because I do so much recipe development but I stock up at restaurant supply stores (shout out to chef’s toys in southern california) because they’re so affordable. I used a half sheet pan for this turkey, but anything bigger and the baking sheet should go up to a full size. Just to be safe, I’d buy a few, you’ll end up using them somewhere else in the dinner process.
- Kitchen Shears. Like I mentioned up above we’re cutting through bones, so you need something that can cut through bones. The good news is that they don’t need to be super high end, these were 2.99 from Target. We don’t have expensive scissors because there’s a weird void in the Wit & Vinegar/Chicano Eats household that just finds them and sucks them up and away forever.
- Crispy Golden Skin Assistance. I used olive oil for this turkey but you could totally use canola or vegetable. The goal is to add some extra fat to make the skin golden brown and crispy and it helps with holding onto the seasonings.
- Salt and Pepper, lots of it. Any extra special flavor is going down under the skin, but we do need the skin itself to taste good, and this also leeches down into the drippings, which is important for the gravy/life.
And now for the how:
First things first: thaw your bird properly. This take a few days in the fridge, don’t mess around. When you’re ready to roast, preheat your oven to 450ºF and grab the right size baking sheet. If you want any extra aromatics like garlic or herbs or any citrus slices lay them out on the baking sheet and set it aside.
Remove the turkey from the packaging and right onto a large baking sheet (or if you’re like me a very clean sink) and remove any extras like the pouch of gizzards and the turkey neck if it’s in there (bonus score if it is, place it in a large stockpot, toss the gizzards).
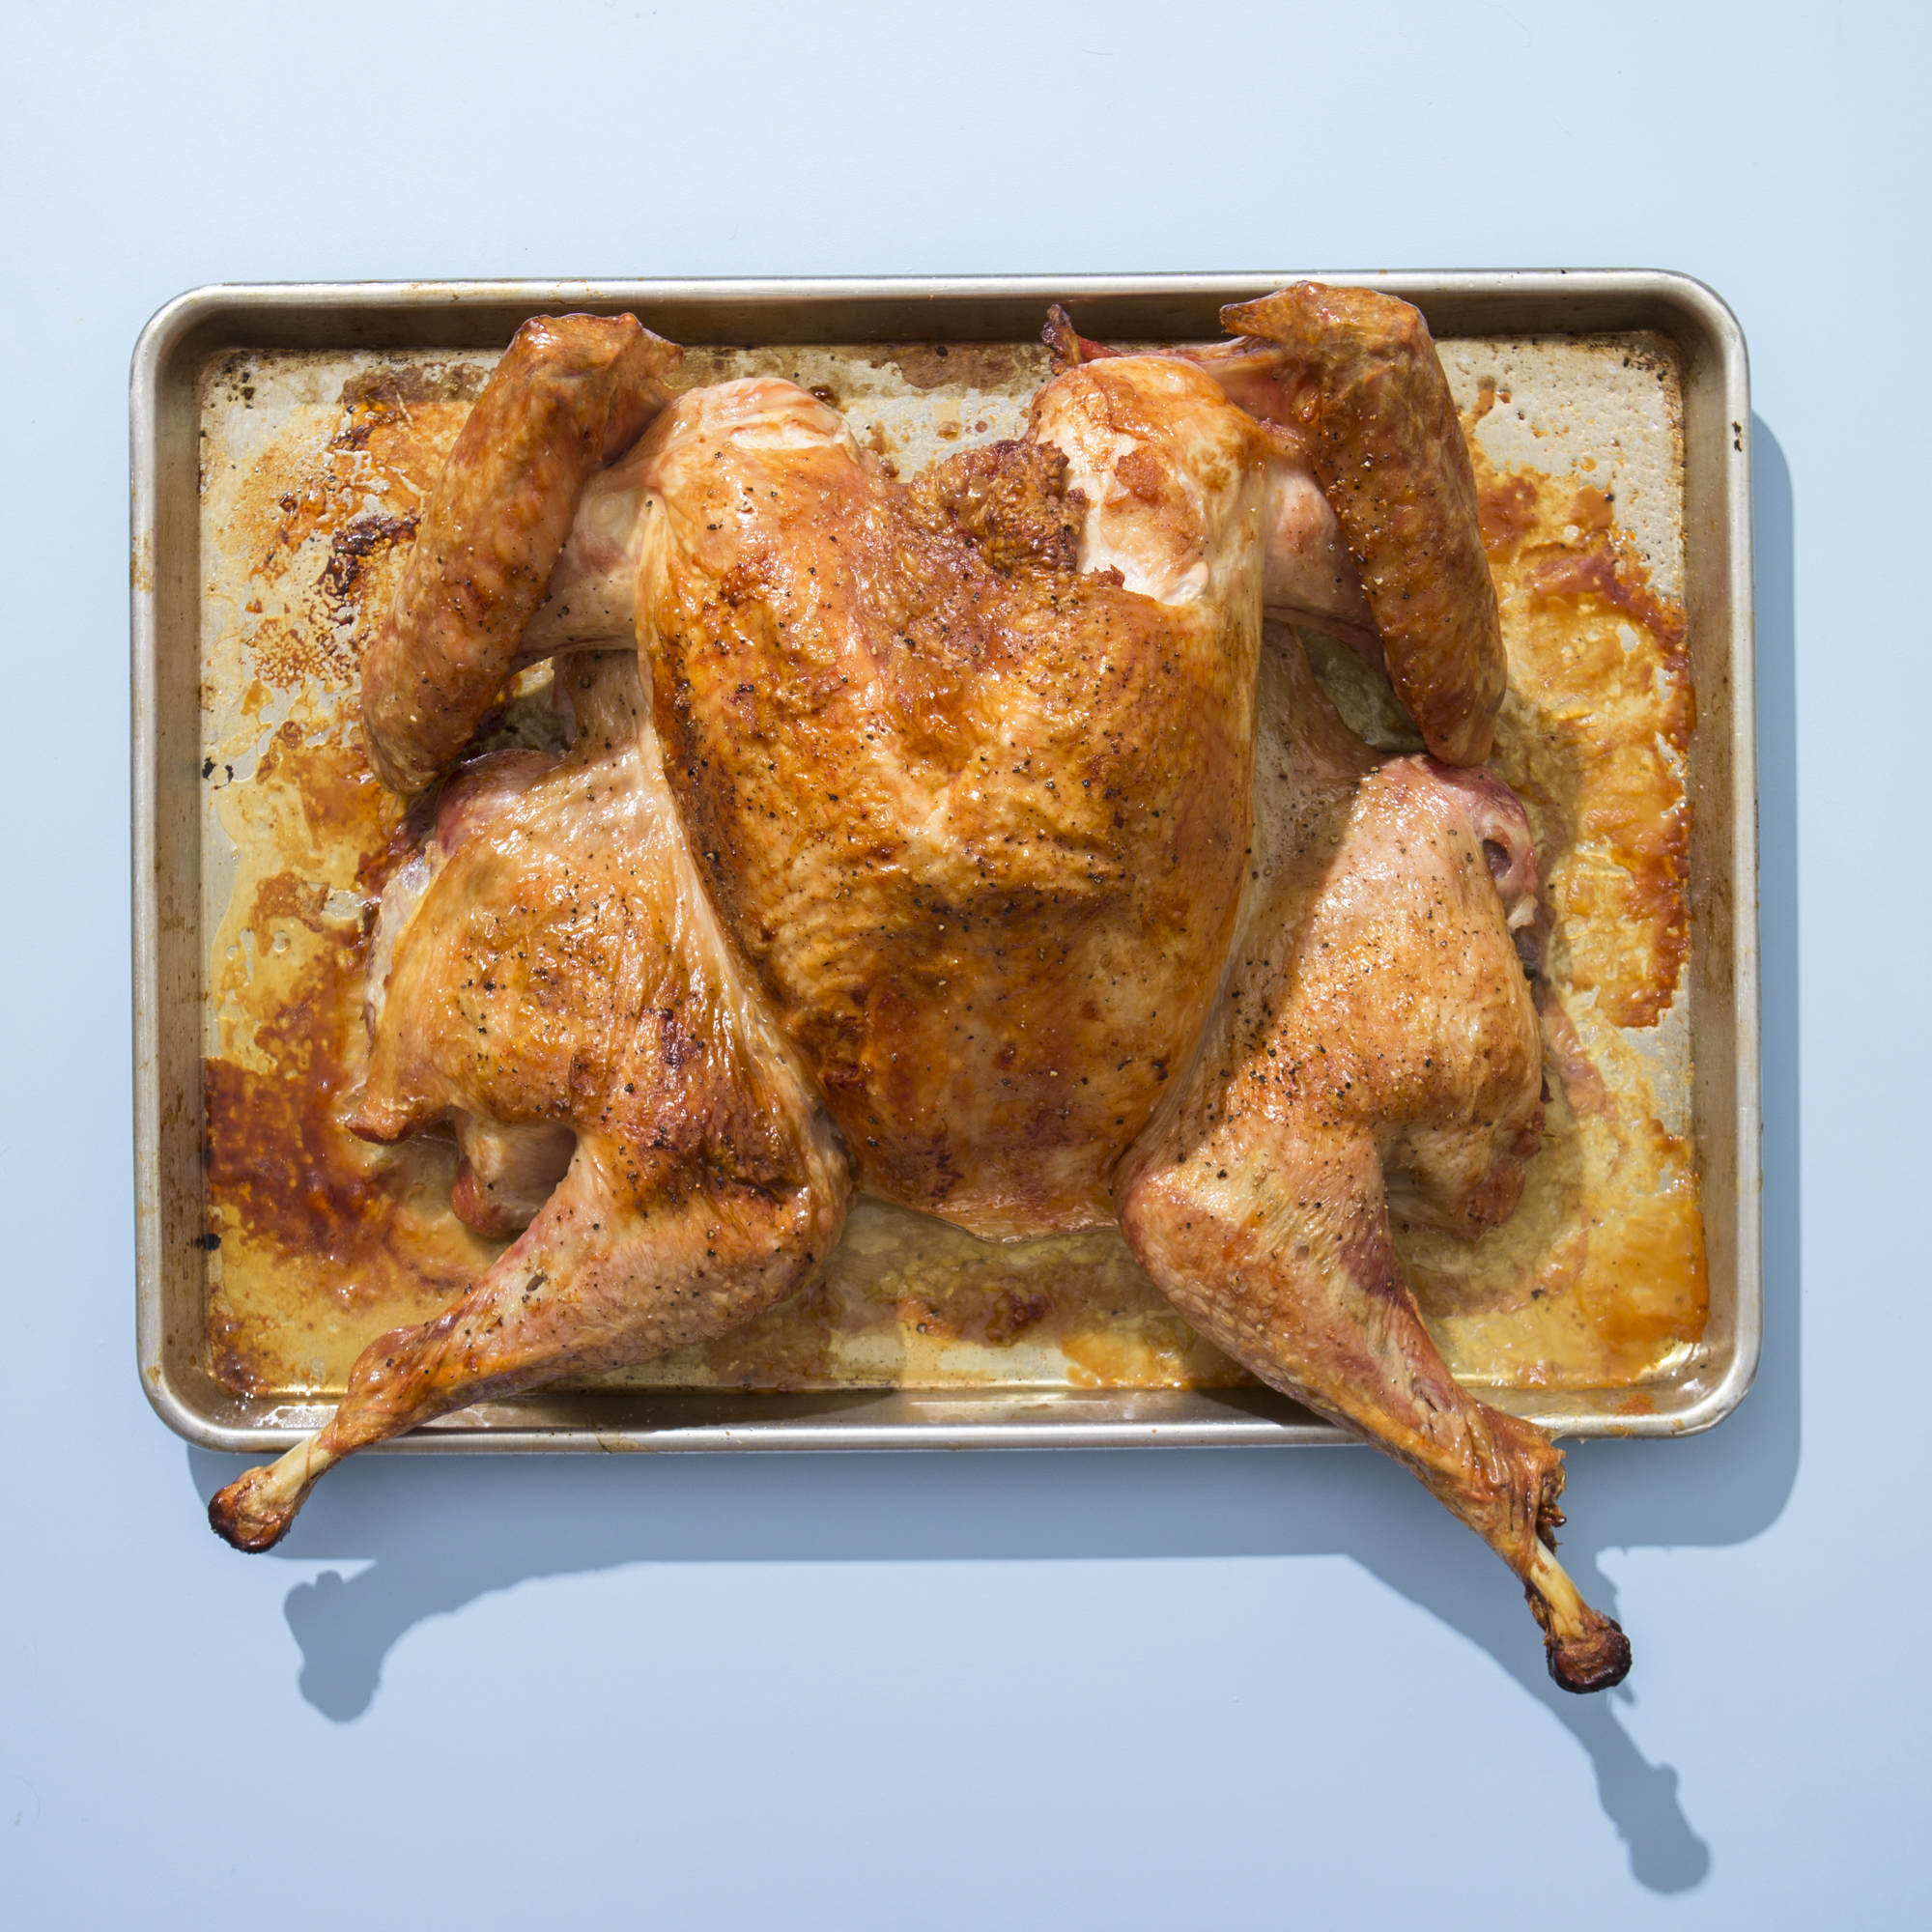
Get the turkey so it’s breast side up, just so we know where we are, then flip it over so the backbone can be removed. Take your kitchen shears and cut on either side of the backbone, it might take some convincing on a couple spots, then once you’ve cut through on both sides toss the bone into the stockpot with the neck if you got it and place the turkey right onto the baking sheet your roasting it on breast side up so it’s sort of splayed out. Use the weight of your body and both hands to push down until you hear the breastplate crack and the turkey can more easily be laid out.
Now we Season: Mix 1/2 stick of softened butter with whatever aromatics you’re feeling and about a teaspoon of coarse kosher salt, there’s really no exact science to this, we just want to have some sort of paste consistency. I used about 4 cloves of garlic (this bitch loves garlic) but you could easily use lemon zest, thyme, sage, rosemary, pimentos?! whatever you’re feeling. Use your fingers to sort of go in and loosen the skin from the turkey breast then scoop up the flavor paste and evenly get it in there so all the breast meat is covered.
Drizzle the skin with olive oil, spread it around then sprinkle evenly with a good douse of coarse kosher salt and pepper. Tuck the wings in to the top to prevent burning and to help it fit better on the baking sheet, then toss is into the oven to roast. 12-14 pound birds can be checked after an hour, and anything larger can start being checked after 70 minutes. The goal is to get a thermometer inserted into the thickest part of thigh to register at 155ºF, but if the meat seems cooked and the skin’s not golden enough another 10 minutes won’t hurt anything. If the opposite happens and the skin is perfect and golden but the meat hasn’t been cooked then lower the temp to 375ºF until it’s cooked completely.
WHILE IT COOKS: Let’s make some stock. The stockpot I had you put the backbone and neck into? Put a carrot, a stalk of celery, a few cloves of garlic, half an onion, a few peppercorns and a couple sprigs of thyme in there and add 2 quarts of water if it’s just the backbone etc and 3 quarts if the neckbone’s involved. Turn the heat on high until it boils then turn it down to low and simmer while the turkey roasts, it should take about an hour to fully get the flavor going and cook down to 1 -1 1/2 quarts of stock. Strain and use however you wish (GRAVY)
Once it’s full cooked and golden, remove it from the oven and let it sit for 15 minutes to cool because it’s blazing hot and nobody wants to try and carve that cleanly.
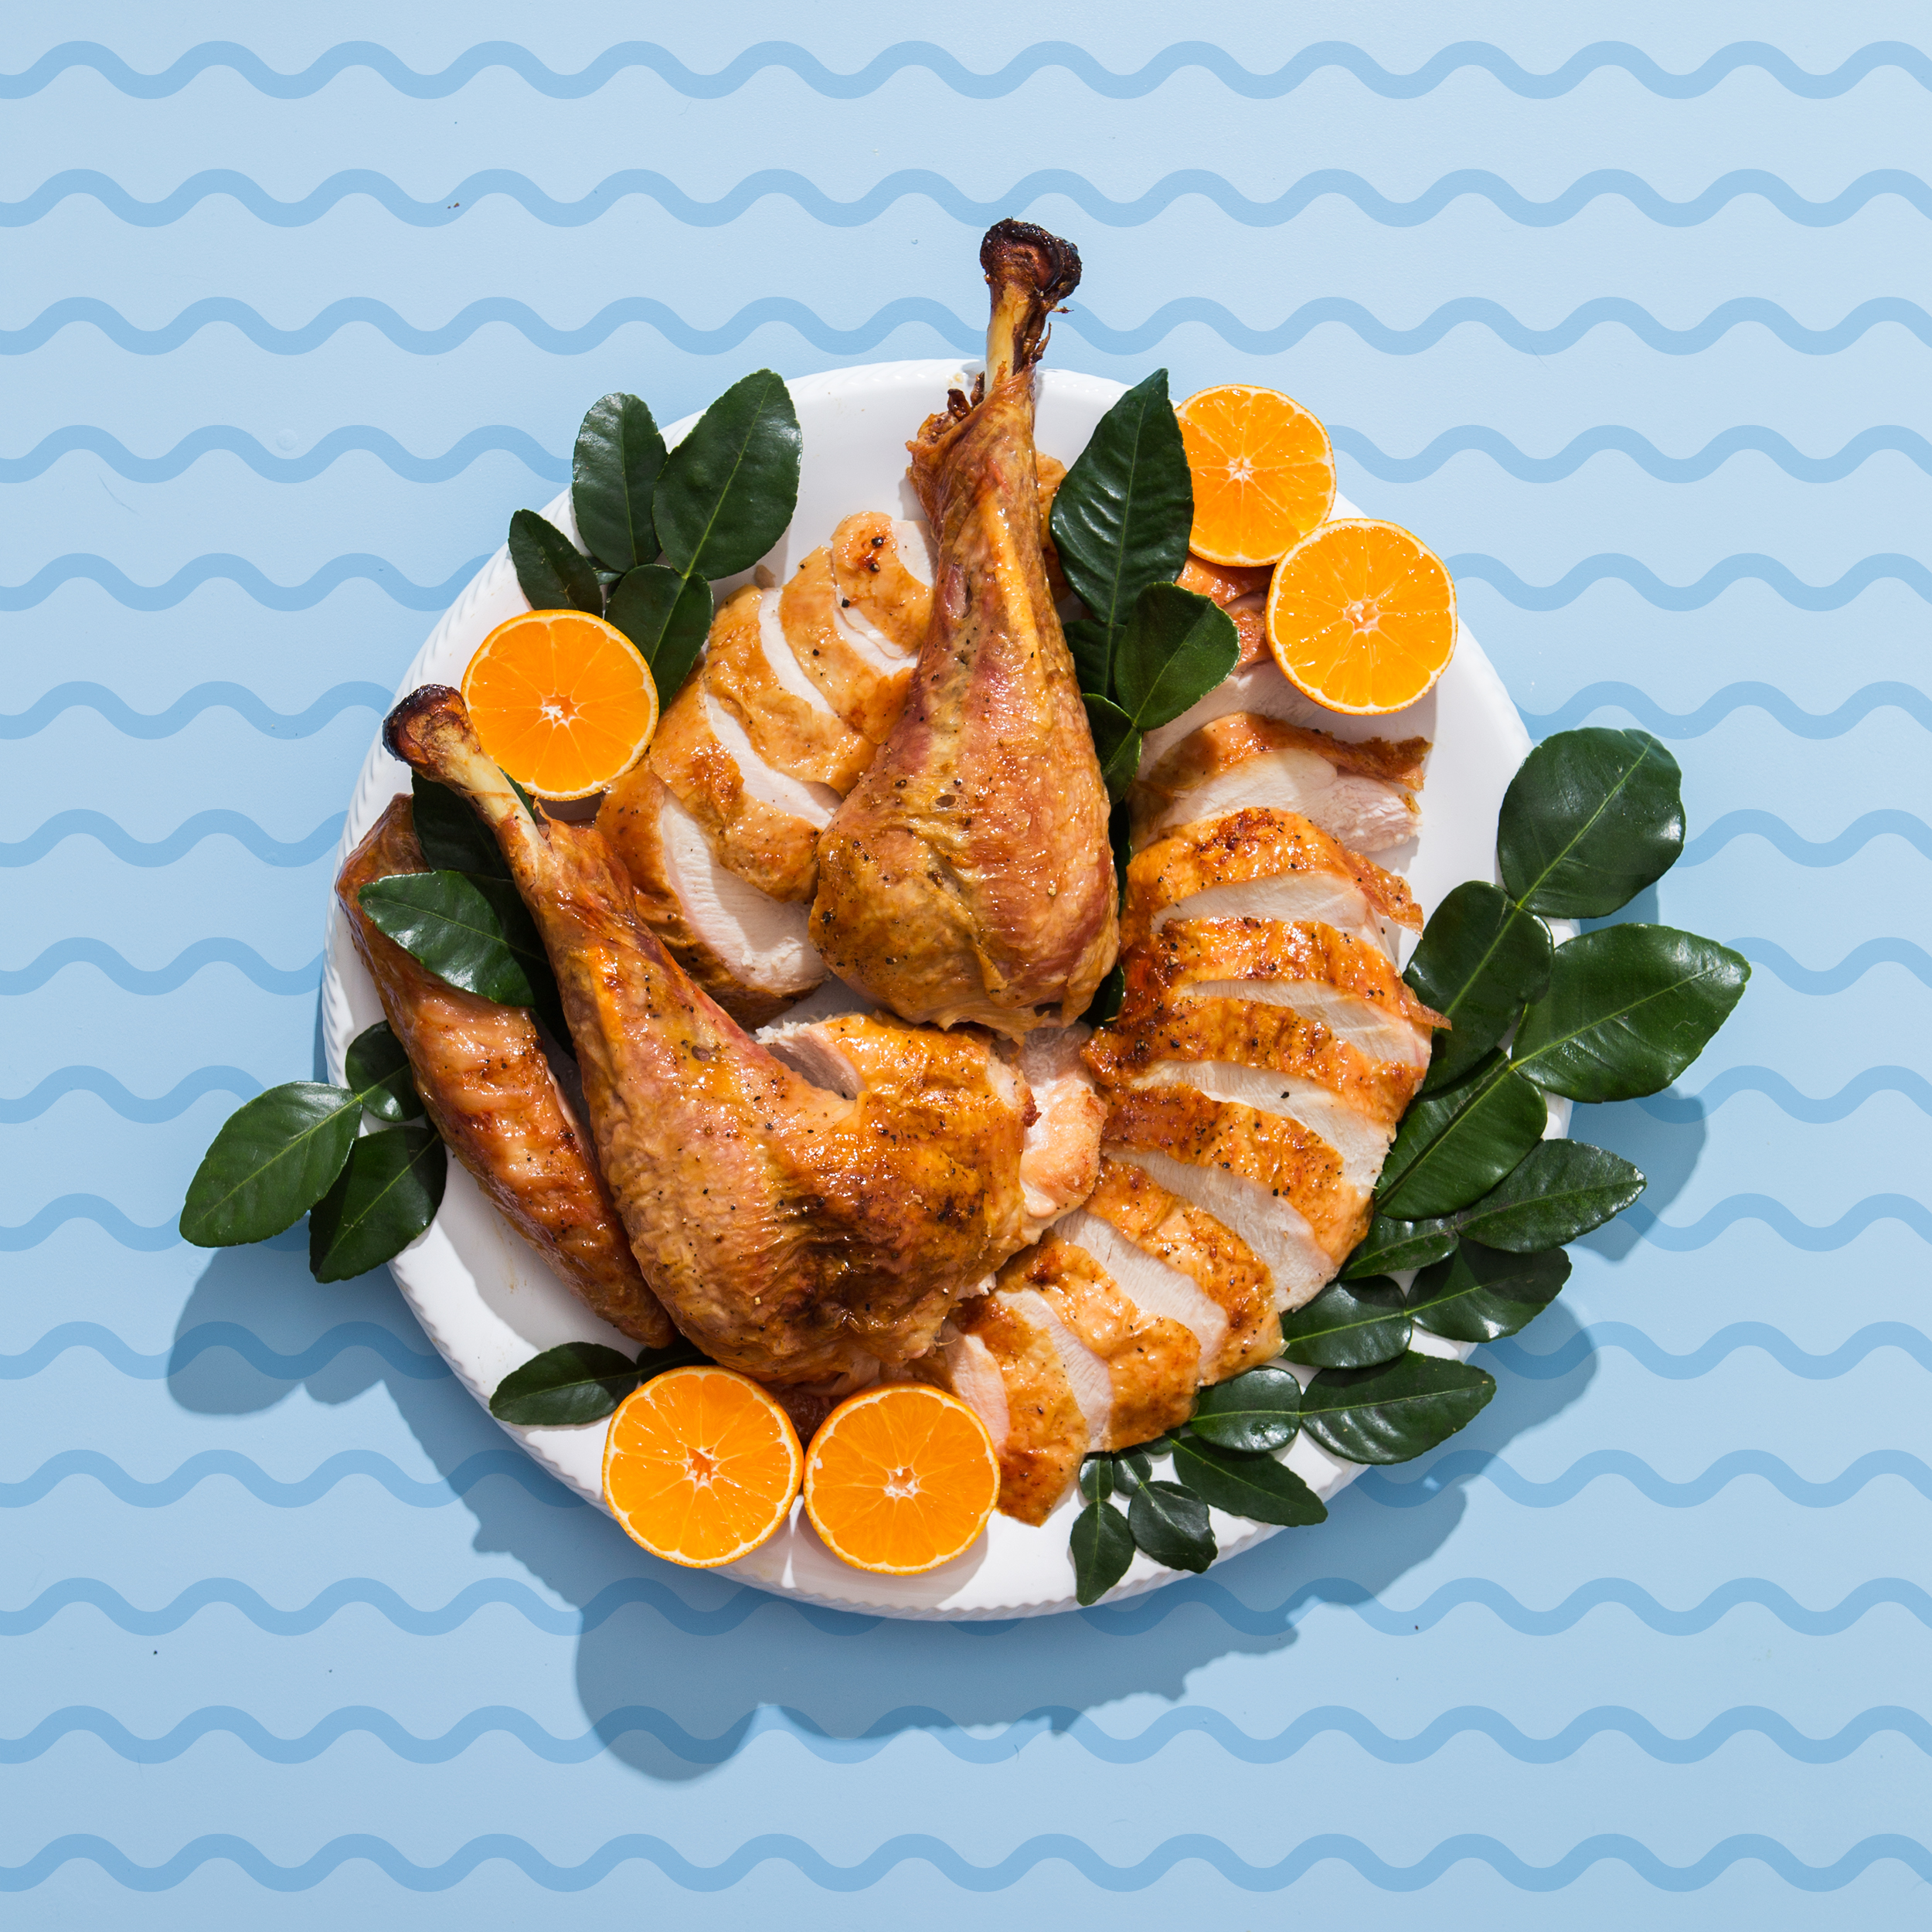
Plating seems to be the most controversial thing about a spatchcocked bird because people just need that norman rockwell whole bird but I think a plated, all nice and carved bird is way prettier and it means you’re not having an audience while carving like this is some America’s got talent mess. I just used some lime leaves I bought at the Asian supermarket with clementines to jush is up, but if that doesn’t convince you, here are some of my favorite examples of plated carved wonders:
Adrianna’s Mojo Turkey, wearing citrus slices and olive branch stems
This beauty from Rachael Ray, wearing pomegranate seeds and herbs
Martha Stewart, keeping it clean and chic, showing some skin with a few herb sprigs
also Martha with some witchcraft, wearing half a citrus orchard and a casual pomegranate
and BA with the most minimal effort but also beautiful and clean
and when you’re done: All those drippings are money so scrape all that fat off the sheet and use in gravy or however you see fit.
